Better Terminal Layout
Windows Setup
I often get asked about my terminal setup. So I decided to create a little writeup about it. First, I mainly use windows, so if you have not done so already, install the (new) Windows Terminal. Next thing you probably want, when developing on windows, is to install the Windows Subsystem for Linux. I use Ubuntu as my Linux distribution. You can install it from the Microsoft Store.
Zsh and Oh My Zsh
Now we are ready to install the tools that make our terminal look nice and be more functional. First, I would change the shell to Zsh and install Oh My Zsh. This is a framework for managing your Zsh configuration. If you cannot install it, because you are working on a machine with limited rights, you can also use conda (or mamba) to install it. Just run
conda install -c conda-forge -n base zsh
and for the Oh My Zsh installation run
sh -c "$(curl -fsSL https://raw.githubusercontent.com/ohmyzsh/ohmyzsh/master/tools/install.sh)"
Spaceship Prompt
Next, we want to install the Spaceship Prompt. Since we already have installed Oh My Zsh, we can just clone the repository into the custom themes folder of Oh My Zsh.
git clone https://github.com/spaceship-prompt/spaceship-prompt.git "$ZSH_CUSTOM/themes/spaceship-prompt" --depth=1
Then we need to create a symbolic link to the spaceship.zsh-theme file in the custom themes folder.
ln -s "$ZSH_CUSTOM/themes/spaceship-prompt/spaceship.zsh-theme" "$ZSH_CUSTOM/themes/spaceship.zsh-theme"
Last, we need to set the theme in the .zshrc file. Open the .zshrc file with your favorite editor and change the
ZSH_THEME variable to spaceship.
ZSH_THEME="spaceship"
TMUX (optional, but highly recommended)
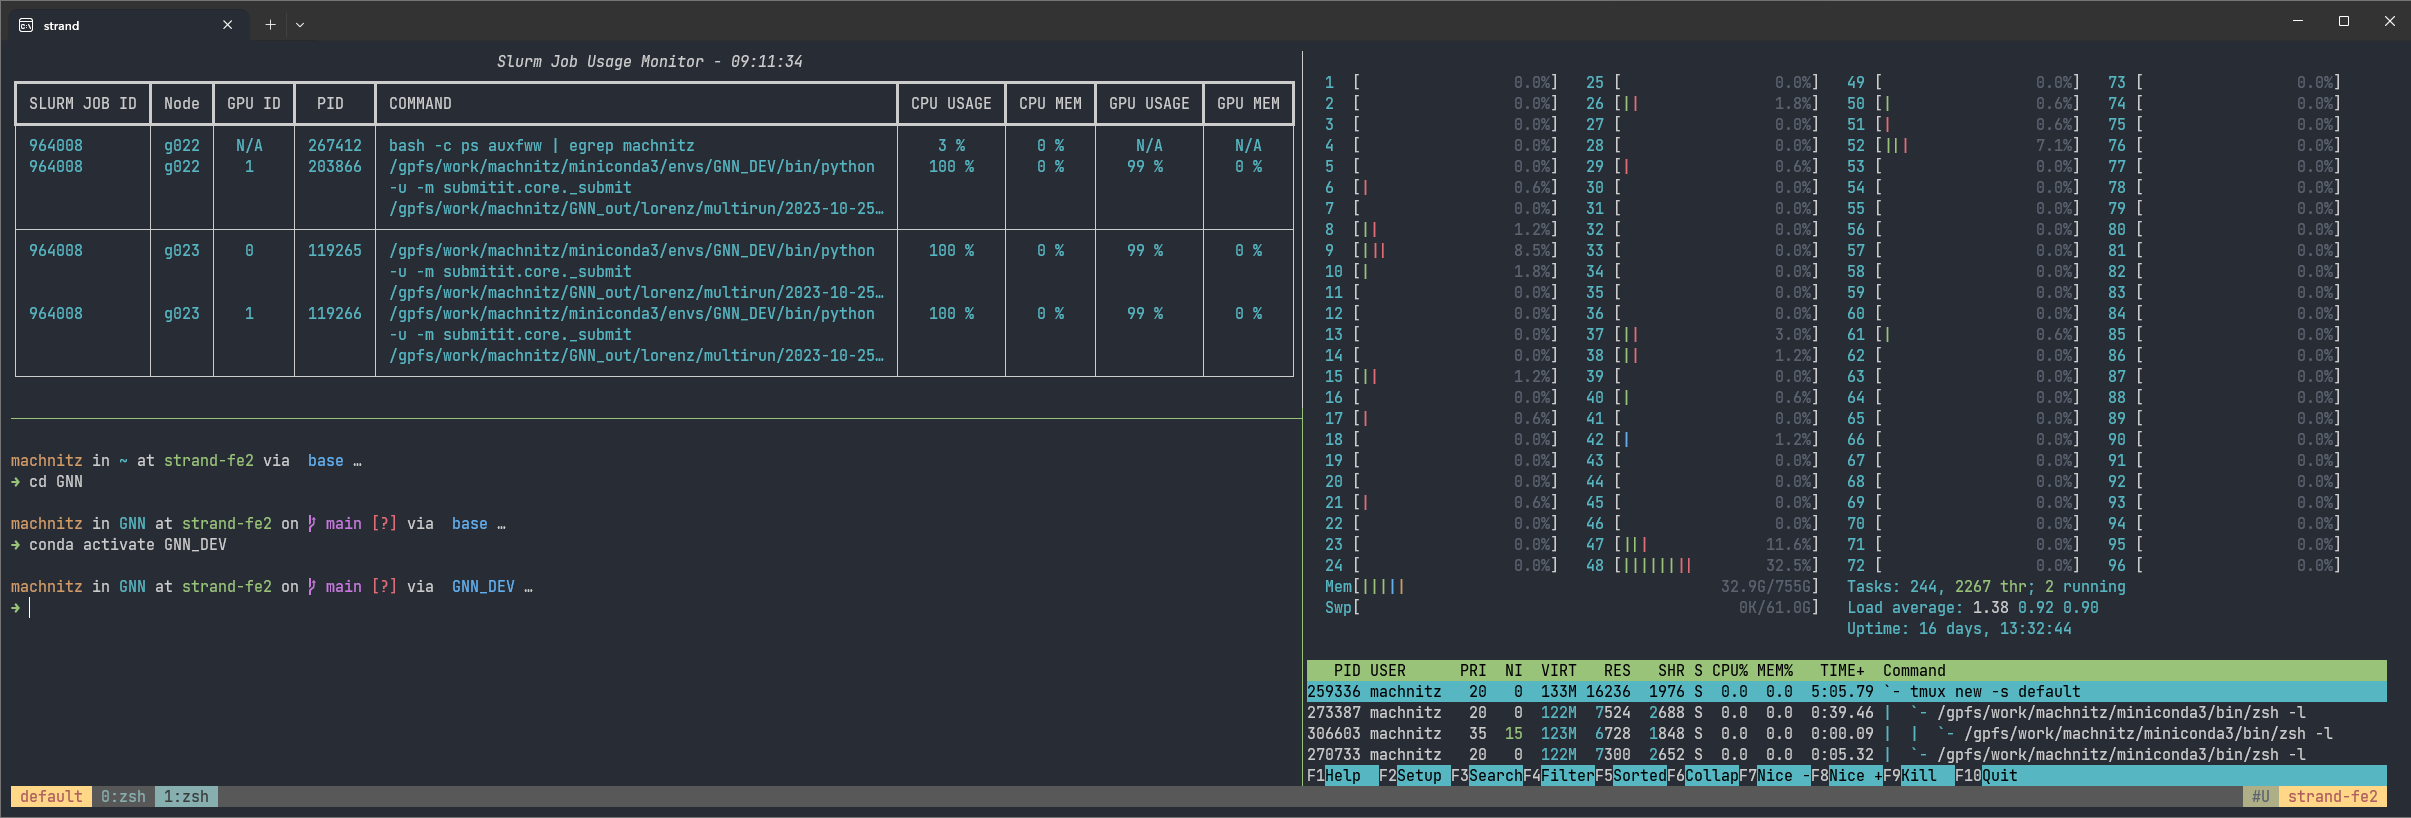
If you don’t already use it, I would also recommend to have a look at TMUX. It is a terminal multiplexer that allows you to split your terminal into multiple panes (Like I did in the screenshot above). It also allows you to create multiple windows and to detach and reattach to a session. This is especially useful when you are working on a remote machine and you want to keep your session running when you log out. You can install it using conda (or mamba).
conda install -c conda-forge -n base tmux
I have to admit that actually getting used to TMUX takes some time, but it is definitely worth it. There are probably a million tutorials already out there on how to use TMUX, so I will not go into detail here. I just want to show you how I configured it. I use the tmux plugin manager tpm to manage my plugins. As you can see from the GitHub Readme, it is super easily installed. My complete tmux configuration looks like this:
set -g @plugin 'tmux-plugins/tpm'
set -g @plugin 'tmux-plugins/tmux-sensible'
set -g @plugin 'tmux-plugins/tmux-pain-control'
set -g @plugin 'tmux-plugins/tmux-copycat'
set -g @plugin 'tmux-plugins/tmux-yank'
set -g @plugin 'tmux-plugins/tmux-prefix-highlight'
set -g @plugin 'soyuka/tmux-current-pane-hostname'
set -g @plugin "arcticicestudio/nord-tmux"
run -b '~/.tmux/plugins/tpm/tpm'
set -g @nord_tmux_no_patched_font "1"
set -g @nord_tmux_show_status_content "0"
set -g status-style "bg=#4c566a,fg=#eceff4"
set -g status-left "#[fg=#bf616a,bg=#ebcb8b,bold] #S "
set -g status-right "#{prefix_highlight} #[bg=#a3be8c,fg=black,bold] #U #[bg=#ebcb8b,fg=#bf616a,bold] #h "
setw -g window-status-format "#[fg=#81a1c1,bg=#4c566a] #I:#W "
setw -g window-status-current-format "#[fg=#2e3440,bg=#81a1c1,bold] #I:#W "
setw -g window-status-separator ""
setw -g mouse on
To be fair, most of the configuration is copied and pasted from different online tutorials about tmux (I really would love to give credit, I just can’t seem to find the sources anymore). I just added more plugins.
Nerd Fonts
Now we need to install the Nerd Fonts. These are fonts that include a lot of icons and symbols that we need for the next step. I personally am a huge fan of the JetBrainsMono Nerd Font. You can find it here. Just download the font and install it. After installation you need to set it as the default font in the Windows Terminal.
Final Remarks
Now you should have a nice looking terminal. If you are on a cluster where you cannot easily change the standard shell you might want to start zsh from your bashrc. To do this, just add the following lines to your .bashrc file.
export SHELL=`which zsh`
[ -z "$ZSH_VERSION" ] && exec "$SHELL" -l
Also, when you have conda installed, you might want to run conda init zsh to make sure that conda is initialized
correctly when you start zsh.